Scentsy warmers have never been so much fun! Unleash your creativity with Scentsy’s DIY (Design It Yourself) warmers. DIY Scentsy Warmers are the perfect backdrop for Scentsy’s coordinating rub-on transfer Theme Packs. The easy-to-apply rub-on designs allow you to change the look of your warmer as often as you like. With 12 Theme Packs ranging from the inspirational to the adorable, the possibilities are endless. Choose a warmer base, choose a Theme Pack, and design an original Scentsy warmer as unique as you are.
Scentsy Rub-On Transfer Instructions
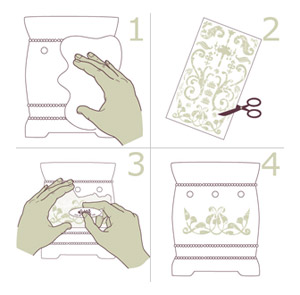
Dress up your Scentsy warmer with rub-on transfers to create a look that’s as unique as you are! Change themes with the season, or to match your mood–it’s all up to you. Be creative!To apply rub-ons to your Scentsy warmer:

- Make sure your Scentsy warmer is clean and dry before you start.
- Select and cut out the design you want to use, and position the rub-on in the desired area.
- Hold the design down firmly and rub the design onto the warmer, working from the outer edges towards the center using the rounded end of the plastic Scentsy rub-on tool (not the flat edge).
- Carefully remove the backing sheet, making sure the entire design has transferred.
Go to my website to see a video about this and you can also contact Shawna Elko for more questions or to order one.

No comments:
Post a Comment